Spot Drill vs Center Drill: Which One Should You Use?
Table of Contents
A spot drill and a center drill can both leave a small conical feature before a larger drilling operation. That visual similarity causes a lot of wrong tool choices. The distinction is simpler than it first appears: a spot drill locates a following drill, while a center drill produces a center hole designed to seat a lathe center.
That difference affects the tool shape, the included angle, the depth you program, and the way the next tool enters the workpiece. A center drill may work as a makeshift spotting tool in a forgiving job, but it is rarely the best default on a machining center. Likewise, a spot drill cannot replace a proper center drill when the workpiece will run between centers.
The short answer
Use a spot drill on a mill, machining center, or live-tool lathe when the next operation is drilling a conventional hole and the main drill needs help starting on location. Use a center drill, also called a combined drill and countersink, when you need a 60-degree center hole for a tailstock center or for turning between centers.
Decision point | Choose a spot drill | Choose a center drill |
Primary purpose | Locate and guide a following drill | Produce a center hole for lathe support |
Typical machine | CNC mill, machining center, live-tool lathe | Manual or CNC lathe |
Working geometry | One short conical point, often 90, 120, 130, or 140 degrees | Small pilot followed by a larger 60-degree countersink section |
Programmed depth | Shallow spot, sized for the next drill or chamfer | Deep enough to create the specified pilot and bearing cone |
Main risk if misapplied | Wrong angle can make the main drill contact at its cutting lips first | Fragile pilot can break; 60-degree cone may be poor preparation for a flatter carbide drill |
What is a spot drill?
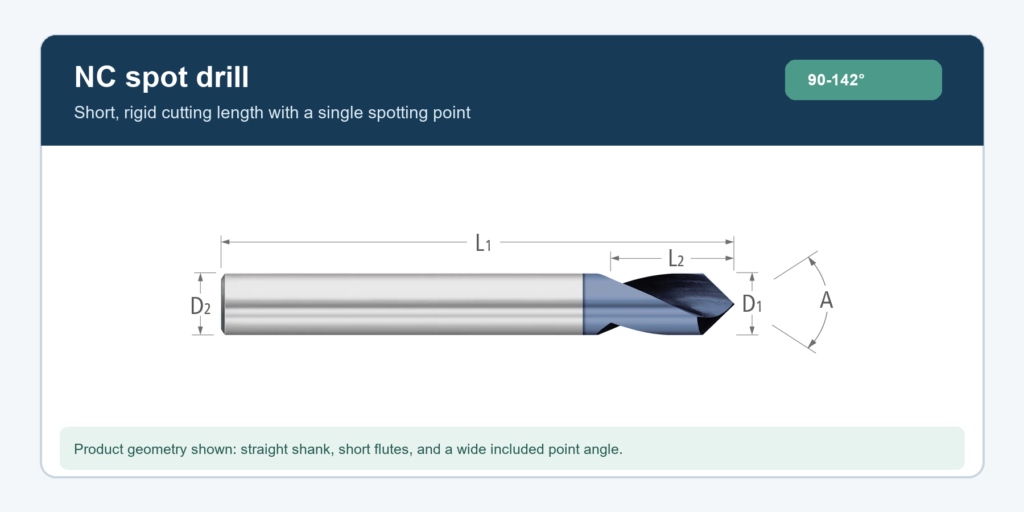
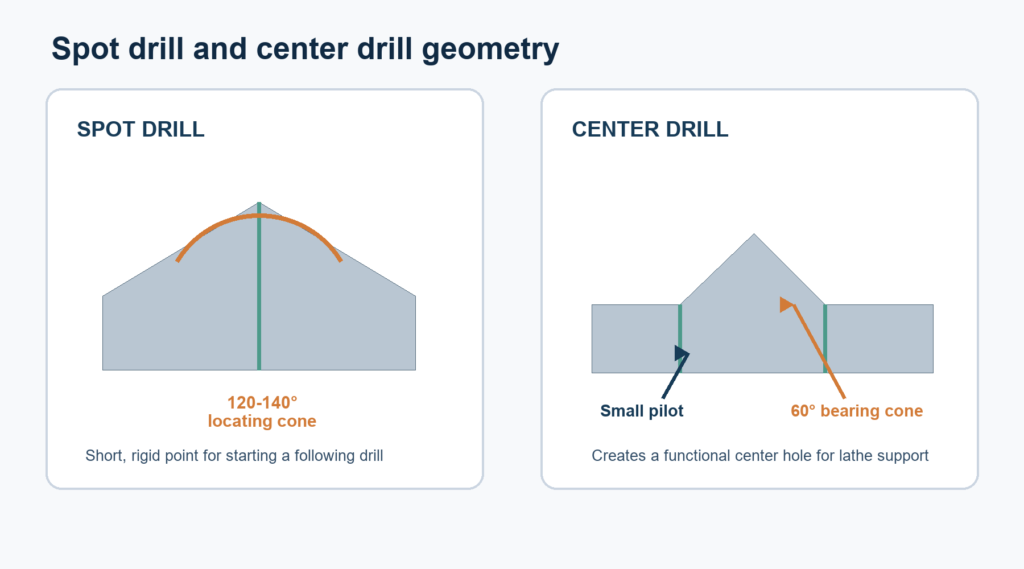
A spot drill is a rigid, short-length tool that cuts a shallow conical seat. Its job is to put the following drill on the correct X-Y location before that drill has enough axial engagement to guide itself. This is particularly useful with long drills, non-split-point HSS drills, tight positional tolerances, and surfaces where a conventional drill may wander during entry.
Modern spot drills are commonly available with 90-, 120-, 130-, or 140-degree included angles. Some ranges also include 60-degree tools, but angle alone does not turn a spot drill into a center drill. A spot drill normally has a single continuous point geometry rather than the small pilot and stepped cone found on a center drill.
The operation should be shallow. You are creating a controlled entry feature, not a deep pilot hole. A large spot drill can start a smaller hole as long as it is not fed to its full diameter. This lets a shop standardize a few spotting tools instead of stocking one diameter for every drill.
What is a center drill?
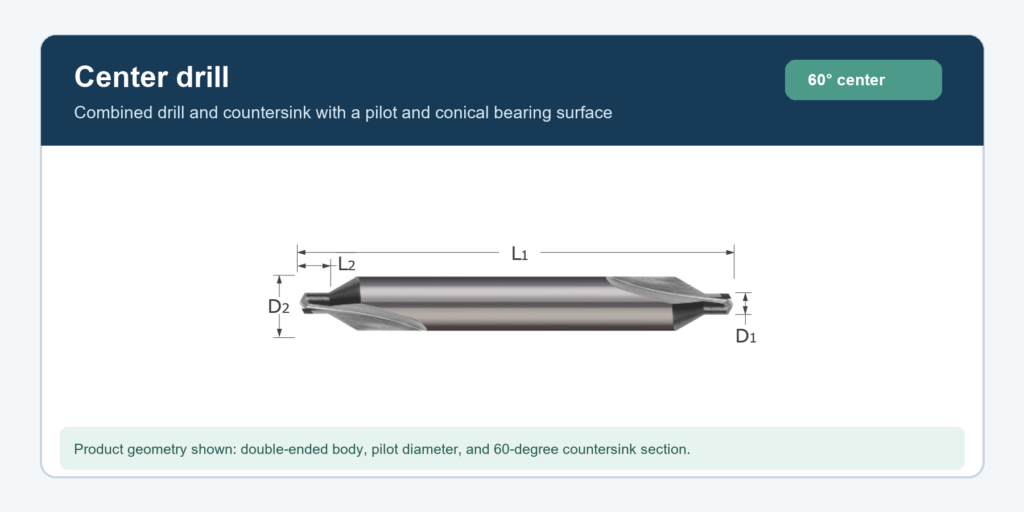
A center drill has two cutting diameters. The small pilot creates clearance for the tip of a dead or live center. The larger conical section forms the bearing surface, commonly at a 60-degree included angle. The finished feature is a functional center hole, not simply a mark for another drill.
DIN-style center drills are often specified as Form A or Form B. Form A produces the basic center hole. Form B adds a protective countersink, typically 120 degrees, around the 60-degree bearing cone. That extra relief protects the working cone from damage at the face of the part. Tool catalogs also include other forms for radiused or specialized center holes, so the print requirement should control the selection.
The narrow pilot is the center drill’s weak point. Excessive feed, runout, or a misaligned tailstock can break it. Select cutting data from the pilot diameter rather than the larger body diameter, and avoid drilling deeper than the center-hole specification requires.
Geometry comparison: why the tools behave differently
The spot drill puts most of its stiffness directly behind the cutting point. That is exactly what a locating operation needs. A center drill is also short overall, but the small pilot projects ahead of the countersink section. The pilot is necessary for center clearance, yet it is more vulnerable to chipping or snapping.
This geometry also explains why substituting a center drill for a spot drill can create trouble. A common 60-degree center-drill cone is much sharper than a 118- to 140-degree twist-drill point. The following drill can contact near the outer portions of its cutting lips before the center of the point is supported. In mild steel with a forgiving HSS drill, the process may appear acceptable. With a brittle carbide drill, a high-value part, or a tight positional tolerance, the margin is much smaller.
Match the spot angle to the following drill
Choose the main drill first. Its point geometry is set by the workpiece material, hole depth, coolant strategy, and drill design. Then select the spot drill to support that tool.
For many carbide-drilling applications, the safest general rule is to use a spot angle equal to or slightly larger than the main drill’s included point angle. A 140-degree spot drill is therefore a common partner for 135- or 140-degree carbide drills. This arrangement encourages the center of the main drill to engage before the outer cutting edges.
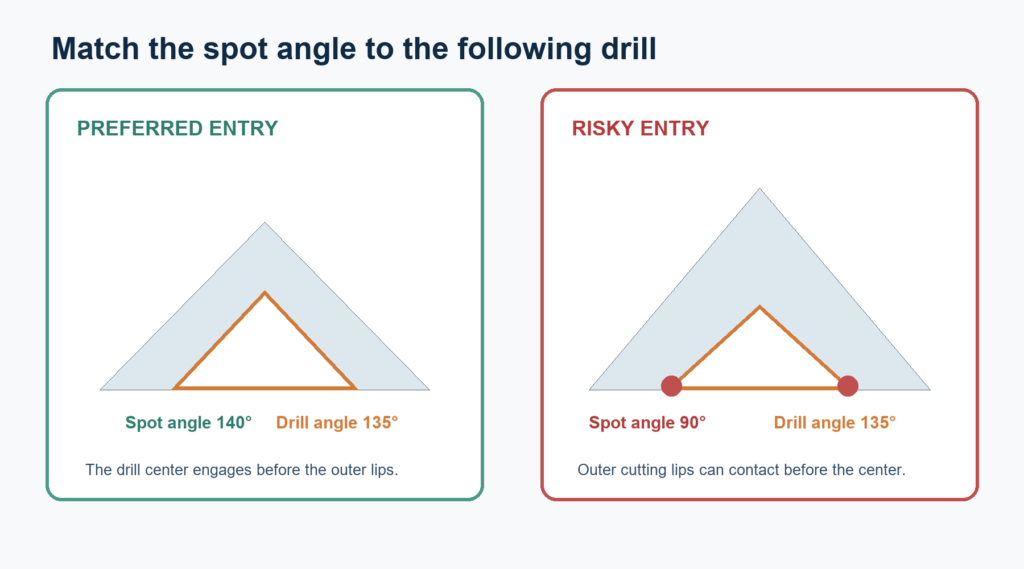
A 90-degree spot may still be useful when the same tool must leave a 90-degree chamfer after drilling, but it is not automatically the best locating geometry for a 135-degree carbide drill. If the operation combines spotting and chamfering, calculate the depth from the required chamfer diameter and verify that the initial seat does not force an unfavorable cutting-lip contact.
Toolmaker guidance takes priority over a generic rule. Some high-performance drills are designed to start directly on a flat surface and may not require spotting at all. An unnecessary spot can add cycle time or interfere with the drill’s intended entry geometry.
When should you skip spotting?
Split-point HSS drills, stub drills, and self-centering solid-carbide drills often start accurately on a flat, perpendicular surface. If the machine, holder, and workpiece setup are rigid, a separate spot cycle may provide no measurable benefit. The correct test is not whether the process has always included a spot drill; it is whether removing that operation changes hole position, roundness, entry condition, or tool life.
Spotting is more likely to help when the drill has a long projection, the surface is rough, positional tolerance is tight, or the drill point is not self-centering. It may be insufficient on a steep angled face or the side of a cylinder. Those entries often need a flat-bottom drill, an end-milled starting pad, or a dedicated cross-hole strategy.
Can either tool be used for chamfering or countersinking?
Both tools can cut a conical feature, but that does not make them universal countersinks. A spot drill can combine hole location with a small entry chamfer when its included angle matches the drawing. This is useful when carousel space or cycle time matters. Watch for a raised burr and confirm the chamfer after the main drill passes through the pre-spot.
A combined drill and countersink is available in 60-, 82-, and 90-degree versions. The 60-degree form is associated with center holes. The 82- and 90-degree versions can prepare seats for matching flat-head screws, provided the pilot and countersink dimensions suit the fastener. A dedicated countersink may still produce a better finish and more consistent diameter when the fastener seat is the critical feature.
Selection by machine and application
Application | Recommended tool | Why |
Locate holes on a CNC machining center before HSS drilling | Spot drill | Rigid point establishes position and reduces walking |
Prepare entry for a 135-degree carbide drill | 140-degree spot drill, unless the drill maker says no spot is needed | Supports center-first engagement and reduces edge impact |
Support a shaft with a live or dead center | 60-degree center drill to the specified form | Produces the pilot clearance and bearing cone required by the center |
Turn a long part between centers | Center drill at both ends | Creates repeatable support on the spindle axis |
Drill on an angled or cylindrical surface | Neither may be sufficient | Create a flat or use a purpose-designed flat-bottom/cross-hole tool |
Spot and leave a small entrance chamfer in one cycle | Spot drill with the required included angle | Combines two features when diameter and finish are noncritical |
Machine type helps, but the finished feature is the deciding factor. A center drill is not mandatory simply because the job runs on a lathe. If a live-tool lathe is drilling radial holes, a spot drill may be the correct choice. On the other hand, a machining center can use a center drill when the drawing genuinely calls for a center hole.
Common mistakes and practical fixes
Symptom | Likely cause | Practical correction |
Main drill chips at entry | Spot angle is too narrow, so the cutting lips contact before the center | Use an equal or wider spot angle; check the drill maker’s entry recommendation |
Hole position drifts | Spot is too shallow, spotting tool has runout, or no spot is used with a wandering drill | Check holder runout and create a clean spot beyond the tool’s chisel-edge width |
Center-drill pilot snaps | Feed is based on the body diameter, alignment is poor, or the tool is fed too deep | Base feed on the pilot, correct alignment, and stop at the specified center-hole size |
Tailstock center marks or damages the hole | Wrong included angle, shallow bearing cone, or damaged center hole | Verify the center-hole form and inspect both the hole and center |
Cycle time rises with no quality gain | A self-centering drill is being spotted unnecessarily | Run a controlled trial without spotting and compare measured results |
One claim worth treating carefully is that spot drilling “reduces heat” or prevents work hardening. A clean, short spot cycle may reduce rubbing compared with a wandering drill, but a dull tool, excessive dwell, or poor parameters can still work-harden stainless steel and nickel alloys. The process benefit comes from controlled entry, not from an inherent low-heat property of the tool name.
A purchasing checklist for tooling buyers
Before ordering, confirm the finished feature and the following operation. For a spot drill, record the main drill point angle, smallest and largest hole diameters, workpiece materials, required coating, and whether the spot must double as a chamfer. For a center drill, specify the standard or form, pilot diameter, body diameter, included angle, center-hole depth, and whether a protective countersink is required.
HSS is economical and tough for general work, especially on manual equipment. Solid carbide offers higher stiffness, wear resistance, and speed potential in stable CNC setups. Material choice does not change the tool’s purpose. A carbide center drill is still a center-hole tool; an HSS spot drill is still a locating tool.

Conclusion
If the next tool is a conventional drill, start your selection with a spot drill and match its angle to that drill. If the finished feature will carry a lathe center, select the correct center-drill form from the print. That rule resolves most of the confusion.
The remaining details are application-specific: whether spotting is necessary, how deep to cut, and whether one tool can also create a chamfer. HNCarbide can help evaluate spot-drill and center-drill geometry for a particular machine, material, and hole specification when a standard catalog choice does not fit the process.